

Transfer Settings copies project standards from one place to another, item by item. It works like Revit's own Transfer Project Standards, but instead of copying a whole category at once you pick exactly the dimension types, view templates, wall types, line styles or A+ profiles you want — from an open project, the central repository or any Revit file — and add them to your project. Use it to bring an office standard into a project, to collect standards from a well-set-up project, or (as an administrator) to update the central repository.
| Where | A+ Tools tab › Settings panel › Transfer Settings |
| You select | A source (From:), a target (To:) and the items to copy |
| You get | The chosen items added to the target, a summary of what was transferred, skipped or failed, and a detailed log |
| Credits (Free licence) | Not available on Free or trial — Transfer Settings is part of the Pro subscription. See Licensing and credits. |
Before you start
- Open the project you want to copy into and make it the active view. Open any other project you want to copy from as well — every open project appears in the From: list.
- To copy from the office standard, a central repository must be set up (see Settings, profiles and repositories). If it is not, the window still opens and shows a warning.
- Make sure nobody has the repository file open in Revit if you plan to transfer into it.
Who can transfer where
| Most users | Administrators | |
|---|---|---|
| From: | The central repository, any other open project, or a file you browse to | The same, plus the active project |
| To: | The active project only | Any open project, the central repository, or a file you browse to (… next to To:) |
"Administrator" means an organisation administrator, or the holder of a personal licence (who administers their own repository). Organisation members who are not administrators only ever transfer into their active project; the … button next to To: is hidden for them.
Note — This is a different role from the Repository manager role that allows Push on the Profile bar. A repository manager who is not an organisation administrator can push profiles but cannot choose the central repository as a Transfer Settings target.
Step by step
- Click A+ Tools › Settings › Transfer Settings. The A+ Transfer Settings window opens and reads the source (splash: Reading settings...).
- Choose the source in From: — the central repository is listed first and selected by default when it is configured. Click … to use a Revit project or template that is not open.
- Choose the target in To: — normally your active project.
- Find what you need in Available settings: expand the disciplines, or type in Filter:.
- Tick the items (or whole groups) and click Add ▶. They appear in To transfer on the right and turn grey on the left.
- Repeat until To transfer holds everything you want. Use ◀ Remove to take items out again.
- Click Transfer. A splash shows Transferring settings....
- Review the result summary. Click View log for the item-by-item detail, then OK.
Cancel (or Esc) closes the window without copying anything.
Note — Changing From: reloads the list and empties To transfer, because the staged items belong to the old source. Pick the source first, then stage.
The A+ Transfer Settings window
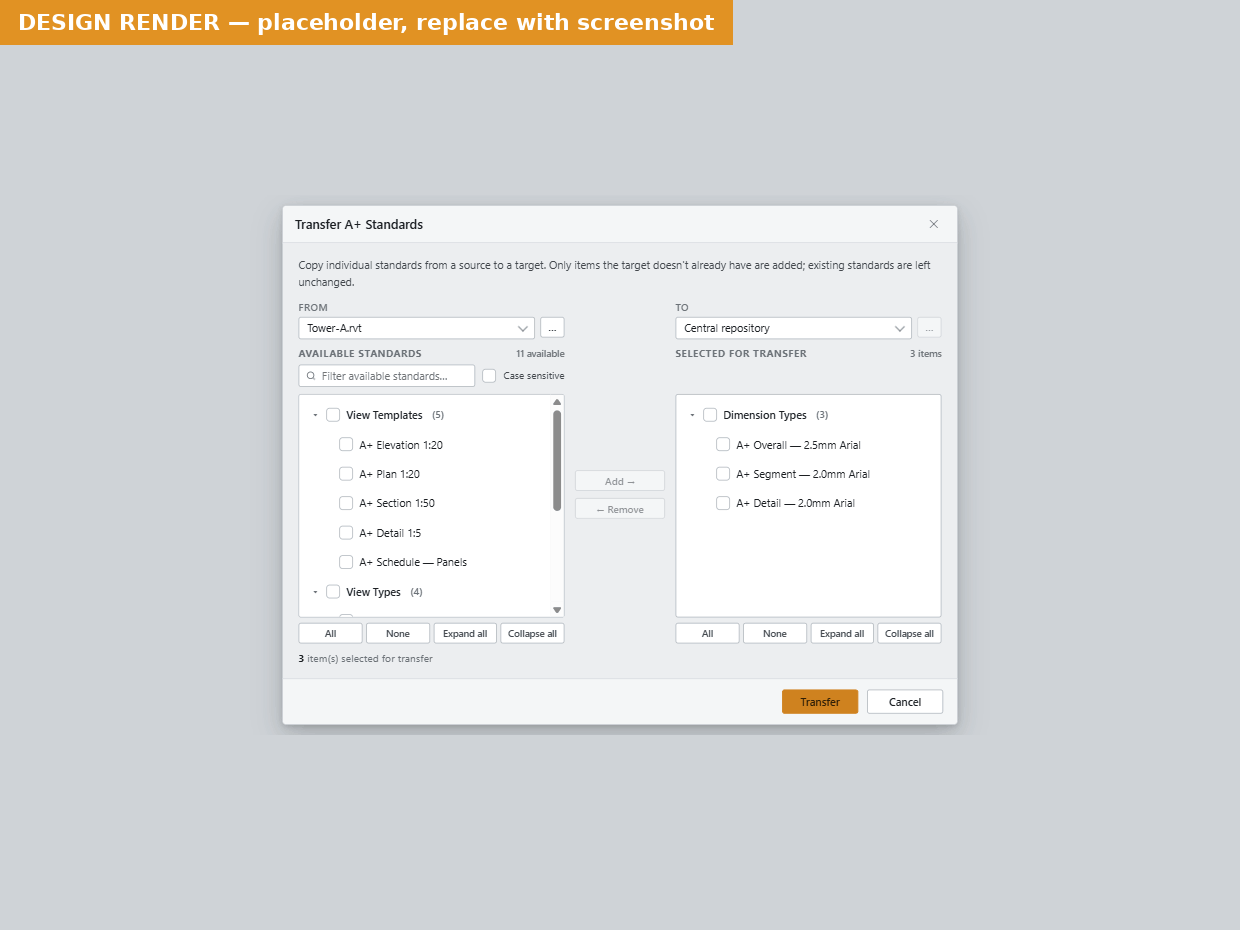 The A+ Transfer Settings window.
From and To
- From: lists the central repository (if configured and the file exists), your open projects, and any files you added with …. Hover over an entry to see its full path.
- To: lists the active project — or, for administrators, every open project, the central repository and any file added with its … button.
- The … buttons open a file picker for Revit projects and templates (
*.rvt; *.rte). A browsed file is opened in the background when needed and closed again afterwards; a browsed target is saved.
Two warnings can appear under the pickers:
| Warning | Meaning |
|---|---|
| Central Repository not configured or available. | No central repository path is set, or the file it points to cannot be found. It is then missing from the lists. Hover over the warning for advice: administrators are pointed to the admin portal, other users to their A+ administrator. |
| Choose a different source and target. | From: and To: are the same project or file. Transfer stays disabled until you change one of them. |
Filter
Type in Filter: to narrow the Available settings tree to matching items; the ✕ clears it. The filter does not affect To transfer.
- Plain text is a "contains" search that ignores upper/lower case. Tick Match case to respect case.
- Text containing regular-expression characters (
^ $ | [ ] { } \or.*,.+,(?) is treated as a regular expression — for example^A\+finds everything starting with "A+", and1:20|1:50finds either scale. An unfinished pattern hides nothing.
This is the same filter as in Load settings.
Available settings
The left tree shows everything in the source that A+ Tools can transfer, grouped as discipline › sub-category › category › individual item:
- A+ Tool Settings (always on top) — the A+ profiles of Curtain Wall Drawing, Create Panel Divisions and Redimension Elevation, one item per profile.
- General, Architecture, Structure, Mechanical, Piping, Electrical, Infrastructure — the Revit standards, for example Dimension Styles, Text Types, View Templates, Viewport Types, Line Styles, Fill Patterns, Materials, Wall Types, Curtain Wall Types, Project Info, Sun Settings.
Only categories that actually contain something in the source are shown, so the tree changes with the source.
Checkboxes:
- Ticking a group ticks everything under it; a group with only some items ticked shows a short amber dash.
- Items already in To transfer stay ticked but turn grey, so you can see what you have staged.
- An amber Unverified label marks a category whose transfer has not been fully verified for every Revit version yet. It can still be transferred; check the result and the log afterwards. (Unverified categories are copied last, so a problem there cannot hold up the others.)
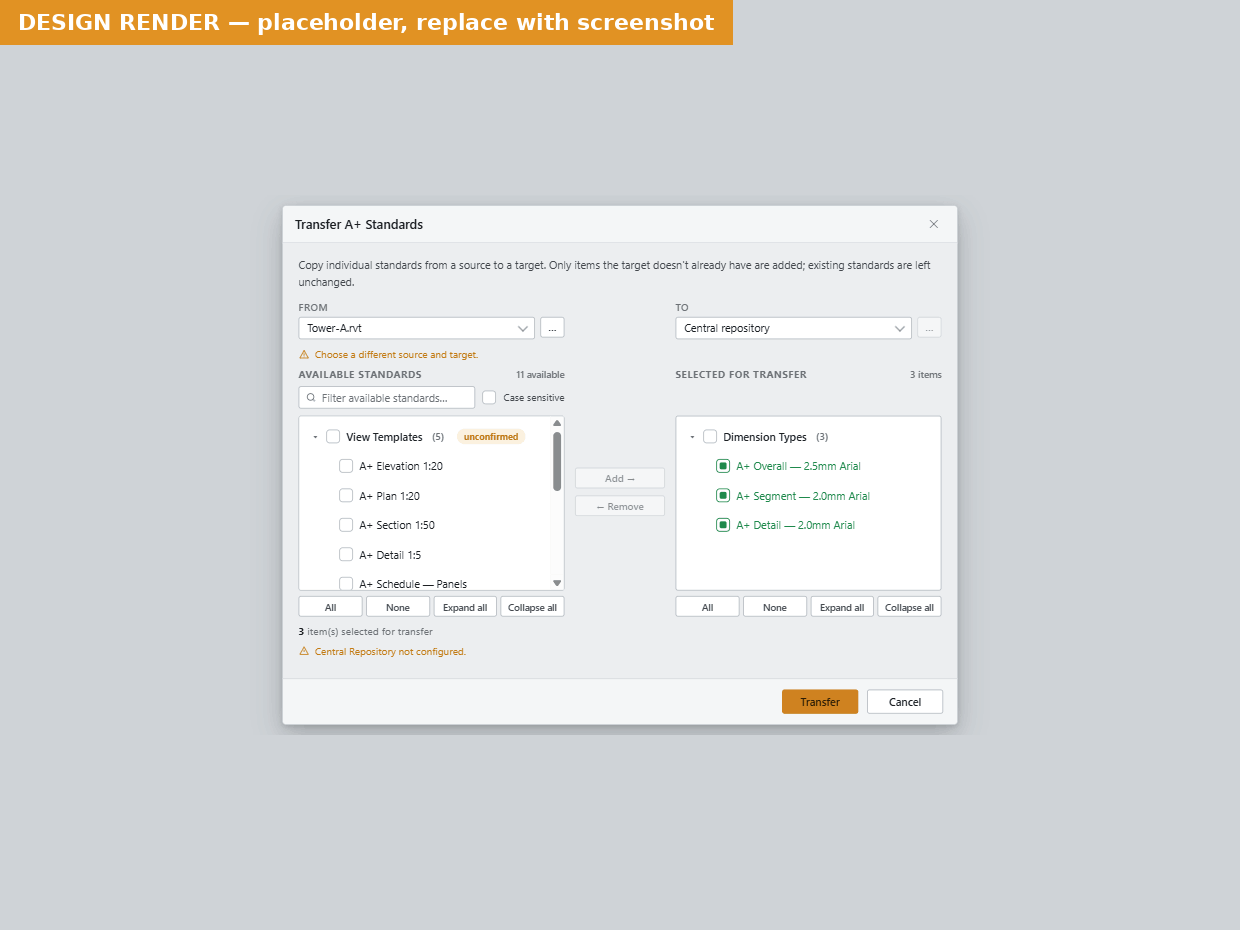 Staged items turn grey; warnings appear under the pickers.
Add, Remove, Add all, Remove all
| Button | What it does |
|---|---|
| Add ▶ | Moves the ticked items on the left into To transfer. |
| ◀ Remove | Removes the ticked items on the right from To transfer and un-ticks them on the left. |
| Add all | Stages everything currently shown on the left — the whole source, or only the matching items while a filter is active. |
| Remove all | Empties To transfer. |
Toolbars and counts
Under each tree:
- All / None — tick or untick every item in that tree. While a filter is active they only affect the items you can see — the same goes for ticking a group.
- Expand all / Collapse all — open or close every group.
- The count under Available settings reads, for example, 12 of 340 selected; under To transfer, 12 staged for transfer.
The right-hand toolbar is disabled while To transfer is empty.
The Note at the bottom left reminds you of the main rule: "only items the target does not already have are added; existing settings are left unchanged." See What gets transferred for the details and one important exception.
What gets transferred
| Kind of item | Examples | What happens if the target already has it |
|---|---|---|
| Named types and elements | Dimension styles, text types, view templates, viewport types, line patterns, materials, wall and curtain wall types | Skipped. An item with the same name in the target is left exactly as it is. Only missing items are added. |
| A+ profiles (A+ Tool Settings) | Facade 1:50 under Curtain Wall Drawing | Skipped if the target already has a profile with that name for that command. A new profile brings its Add as menu item to ribbon setting and any types it uses that the target lacks. If the target had no valid selected profile, the first transferred one becomes selected. |
| Project-wide settings | Object Styles, Project Info, Sun Settings, Structural Settings, Electrical Settings, Duct Settings | Replaced. These settings always exist in a project, so transferring one writes the source's values over the target's. |
Important — Transferring a project-wide settings row (such as Object Styles or Project Info) overwrites the target's current values, even though the in-window Note says existing settings are left unchanged. Only stage these rows when you mean to replace them.
Undo. A transfer into a project is recorded in Revit's undo list as A+ Transfer Settings and can be undone. A transfer into the central repository or a browsed file is saved straight into that file and cannot be undone from your project.
After a transfer into the active project, the ribbon is refreshed, so transferred profiles with Add as menu item to ribbon switched on appear straight away (see Profiles on the ribbon).
Results and the transfer log
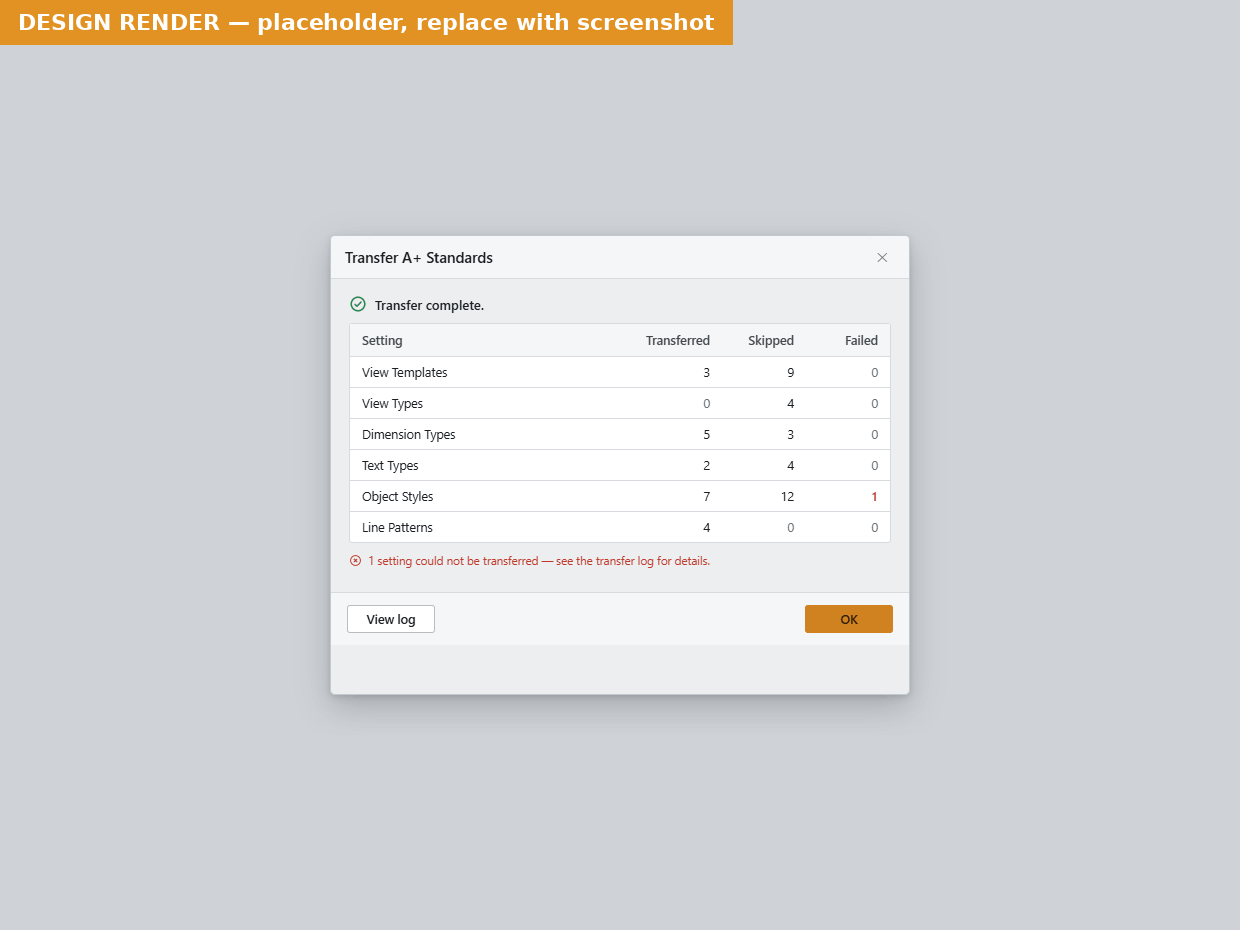 The result summary.
When the transfer finishes, Transfer complete. lists one row per category:
| Column | Meaning |
|---|---|
| Setting | The category, shown as its path in the tree |
| Transferred | Items added (or, for project-wide settings, values applied) |
| Skipped | Items left alone because the target already had them |
| Failed | Items that could not be transferred (shown in red) — see the log |
View log opens the detailed transfer log in Notepad: one block per category, with every item marked as transferred or skipped, and the reason for any failure. The logs are kept in:
%LOCALAPPDATA%\Aedificon\A+ for Revit 2026\logs\transfers\
(for Revit 2027, A+ for Revit 2027), one file per run named SettingsTransfer_<date>_<time>.log. Logs older than 30 days are deleted automatically the next time you run a transfer. If Notepad cannot open the log, A+ Tools shows its path so you can open it yourself.
Progress splash
| Splash text | When |
|---|---|
| Reading settings... | The window opens, or you choose another source — A+ Tools reads what the source contains |
| Transferring settings... | After you click Transfer |
The splash closes by itself. Reading a repository or a closed file takes longer because Revit has to open it.
Writing to the central repository
Only administrators can choose the central repository (or a browsed file) under To: — see Who can transfer where. When they do:
- A+ Tools first checks that nobody else has the file open. If it is in use you see The central file is locked. and nothing is copied.
- The repository is opened, the staged items are added, and the file is saved and closed.
- Everyone who loads from the central repository afterwards gets the new items.
Repository managers who are not administrators publish individual A+ profiles with Push on the Profile bar instead — see Push to repository.
Tips
Tip — Start a new project with the office standard. From: Central repository, To: your project, filter for what your drawings need (for example
Dimension|Text|View Templates), Add ▶, Transfer. Existing types in the project are never touched.
Tip — Copy A+ profiles between projects. Open both projects, make the target active, choose the other project in From:, expand A+ Tool Settings, tick the profiles and transfer. Their dimension types, view templates and tags come along.
Tip — Harvest from a good project (administrators). Open the project that has the standards you like, choose it as From: and Central repository as To:, and stage the new types. Only types the repository does not have yet are added.
Tip — Use the filter with a regular expression to stage a family of items in one go:
^A\+picks every item whose name starts with "A+", ready for All › Add ▶.
Tip — Want to replace a type that already exists in the target? Transfer Settings will skip it. Rename or delete the old type in the target first, then transfer.
Tip — Pick From: before you start staging — changing the source clears To transfer.
Messages you might see
| Message | What it means | What to do |
|---|---|---|
| A source and a target are required. | There is nothing to transfer between — usually no project is open, or (for most users) the only other source would be the active project itself. | Open the project to copy into (and one to copy from), or ask an administrator to configure the central repository. |
| The source and target are the same project. | From: and To: point at the same project. | Choose a different source or target. |
| The central file is locked. | Someone (named if known) has the repository file open. | Try again later. |
| The transfer log could not be opened. It is saved at: | Notepad could not be started. | Open the file at the path shown. |
| This project requires a newer version of A+ Tools. | The active project's A+ settings come from a newer plugin. | Click Upgrade and install the update. |
| Pro feature | Your licence does not include Transfer Settings. | Click Upgrade to see the plans in the licence portal. |
| A row fails with "…was saved by a newer version of A+ Tools — update the plugin to transfer its settings." | The source or target's A+ profiles come from a newer plugin. | Update A+ Tools. |
The full list is on Messages and troubleshooting.
Related pages
- Settings, profiles and repositories — central repository, profiles, Load and Push
- Settings Manager
- Licensing and credits
- Messages and troubleshooting
Last updated 2026-10-02.