
Every A+ Tools drawing command — Create Drawing, Create Panel Divisions and Redimension Elevation — reads its settings from a named profile stored in your Revit project. This page explains where those settings live, how profiles work, and how to use the Profile bar at the top of every settings window to switch, copy, load and publish them. Read it once and the same rules apply to all three commands.
| Where | The Profile bar at the top of Curtain Wall Drawing Settings, Panel Division Settings and Dimension Settings (also inside the Settings Manager) |
| Applies to | Create Drawing, Create Panel Divisions, Redimension Elevation |
| Stored in | The Revit project (profiles), repository .rte files (shared standards), and a small per-user file (your personal preferences) |
| Credits (Free licence) | Managing settings costs nothing — see Licensing and credits |
Where your settings live
A+ Tools keeps four kinds of settings in four places. Only the first one is used when a command runs; the others are sources you copy from or publish to.
| Place | What it holds | Who sees it | How it gets there |
|---|---|---|---|
The Revit project (.rvt) |
Every profile of every command, which profile is selected, and the standard types the profiles point at | Everyone who opens the project | Seeded automatically the first time, then edited with the settings windows |
| Sample repository (shipped with A+ Tools) | The A+ default profiles plus the dimension types, view templates, tags and other types they use | Everyone on this computer | Installed by the A+ Tools setup |
| Central repository (organisation) or template repository (personal) | Your office's (or your own) published profiles plus the types they use | Everyone who points at the same file | You (or your BIM manager) publish profiles into it with Push |
| Your personal preferences | Plugin language, logging level, repository paths | Only you, on this computer | A+ menu › Plugin settings |
How settings flow between them:
- Sample repository → project — automatically, the first time A+ Tools touches a project that has no A+ settings yet, and again whenever you click Restore defaults….
- Central / template repository → project — only when you click Load settings… on the Profile bar (or use Transfer Settings).
- Project → central / template repository — only when someone with the right role clicks Push on the Profile bar (or an administrator uses Transfer Settings).
- Project → project — with Transfer Settings, or by loading from another file with the … button in Load settings.
Note — Nothing flows automatically from the central repository into a project. If your BIM manager updates a profile in the central repository, projects keep their own copy until someone loads the new version.
Settings stored in the project
Your drawing settings are saved inside the Revit project, not on your PC. That means:
- Everyone who opens the project gets the same profiles and therefore the same drawings.
- The settings travel with the file when you copy, archive or send it.
- A setting that points at a Revit type (for example a dimension type or a view template) follows that type if you rename it in the project.
Settings cannot be stored in a family file, a linked model or a read-only file.
The sample repository
The sample repository is a Revit template that ships with A+ Tools:
%PROGRAMDATA%\Aedificon\A+ for Revit 2026\A+ Tools Default Local Repository for Revit 2026.rte
(For Revit 2027, replace both 2026s with 2027.) It contains the A+ default profiles and the types they use, so a brand-new project works with no setup. The first time you open an A+ settings window or run an A+ command in a project without A+ settings, A+ Tools:
- copies all the sample repository's profiles into the project,
- copies in any dimension types, view templates, tags and similar types those profiles need and the project lacks (existing types are never changed), and
- records this as a single Revit undo step, Load A+ Standards.
The path is shown (read-only) in A+ menu › Plugin settings › Repositories › Sample repository. If the file is missing it is shown in red with (file not found). IT can point it at another .rte by editing APlusDefaultSampleRepository in your preferences file (see Your personal preferences).
The central repository and the template repository
This is a Revit template (.rte) where finished profiles are kept so they can be reused across projects. It has two names depending on your plan:
| Your plan | What it is called | Who sets the path |
|---|---|---|
| Team or Enterprise (an organisation) | Central repository — one shared file for the whole office | A repository administrator, in Plugin settings › Browse…. The path is then applied to every member of the organisation the next time they start Revit. Other members see the path but cannot change it. |
| Trial, Free, Pro or Perpetual (personal) | Template repository — your own file | You, in Plugin settings › Browse… (pick any .rte) |
Both work the same way: you Load profiles from it and (with the right role) Push profiles into it. See the A+ menu page for the Plugin settings dialog.
Tip — To start a template repository, copy the shipped sample repository
.rteto a folder you back up (for example a network share), then select the copy with Browse…. Never edit the shipped file itself: it is replaced when A+ Tools is updated.
Your personal preferences
A small file on your computer stores only personal, per-machine choices — plugin language, logging level, the repository paths and your account role. It never holds drawing settings.
%LOCALAPPDATA%\Aedificon\A+ for Revit 2026\Settings.xml
Open it from Plugin settings › Local settings and logs › Local settings › Open. It is created on first run from a template IT can pre-configure at %PROGRAMDATA%\Aedificon\A+ for Revit 2026\Settings.xml.
Profiles
A profile is a named, complete set of settings for one command. Each command keeps its own list of profiles, so you can, for example, have Facade 1:50 and Interior partitions 1:20 for Create Drawing, and a separate list for Redimension Elevation.
- The break-out commands store only what they use: a Create Panel Divisions profile holds just the panel division settings; a Redimension Elevation profile holds the dimension types, dimension text overrides and substitutions.
- One profile per command is selected. That is the one the command uses when you click its ribbon button. Switching profiles in a settings window changes the selection.
- Profile lists are always sorted alphabetically.
The "Default" profile
Every command always has at least one profile:
- In a new project the profiles come from the sample repository, named as they are there.
- If no sample repository can be read (and you see the Default Sample Project Not Found warning), A+ Tools creates a profile called Default from built-in values instead. You will then need to configure view templates, dimension types and so on yourself.
"Default" is an ordinary profile: you can rename it, and delete it once another profile exists. The last remaining profile of a command can never be deleted.
The Profile bar
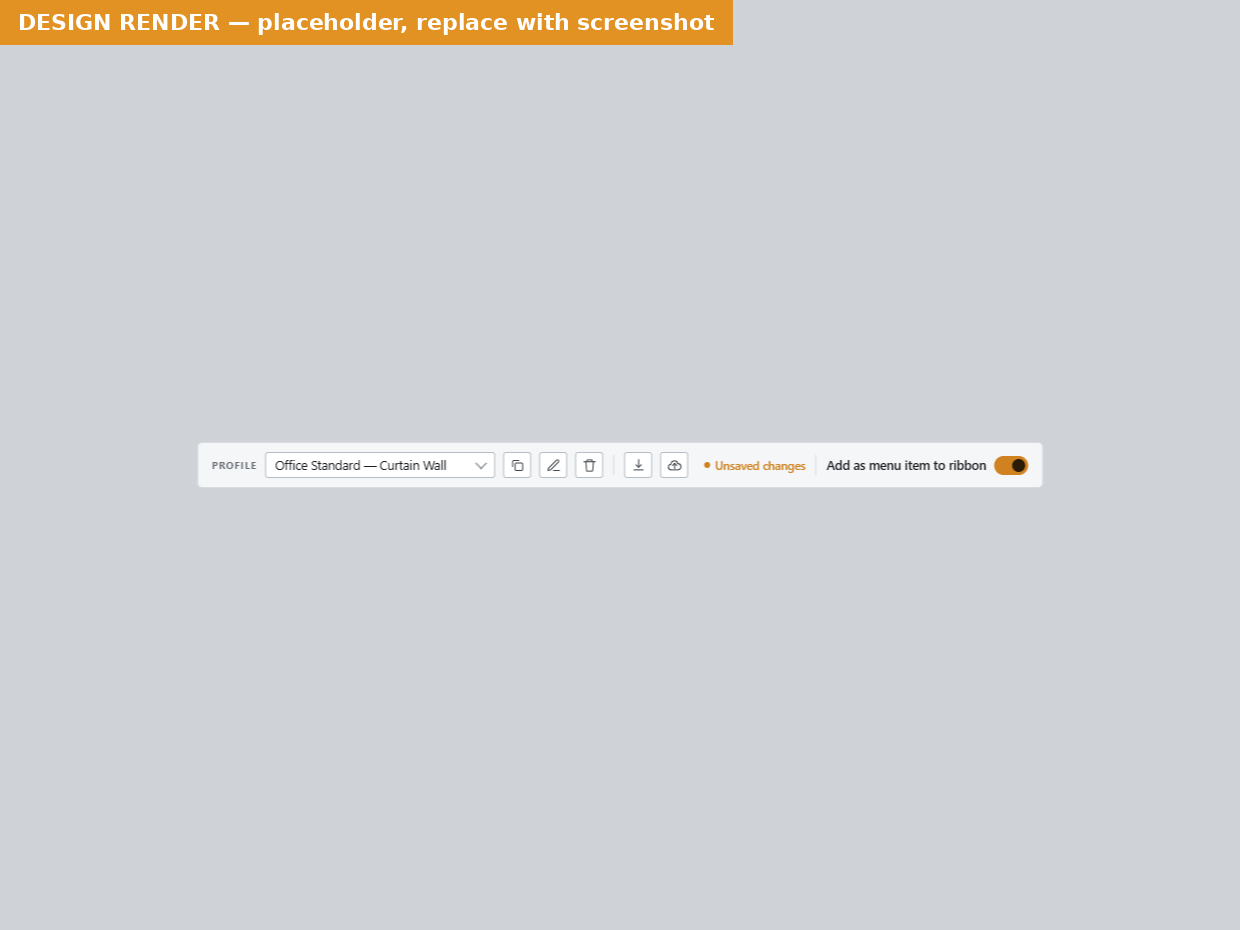 The Profile bar at the top of every A+ settings window.
From left to right:
| Control | What it does |
|---|---|
| PROFILE dropdown | Shows the selected profile. Pick another to switch; its settings load into the window. |
| Duplicate | Saves the current settings as a new profile and selects it. |
| Rename | Renames the selected profile. |
| Delete | Deletes the selected profile (disabled when it is the only one). |
| Load settings… | Imports profiles from the central/template repository or another file. See Load settings. |
| Push to central repository… / Save to local template repository | Publishes the profile you are editing into the repository. Shown only to users who may publish. See Push to repository. |
| Unsaved changes badge | Appears whenever you have edits that are not yet saved — exactly when Apply is enabled. |
| Add as menu item to ribbon | Puts this profile on the ribbon as its own menu item. See Profiles on the ribbon. |
In the narrower Panel Division Settings window the Add as menu item to ribbon switch sits on a second row under the bar.
Switching profiles and the unsaved-changes prompt
If you pick another profile (or click Duplicate or Load settings…) while the badge shows Unsaved changes, A+ Tools asks:
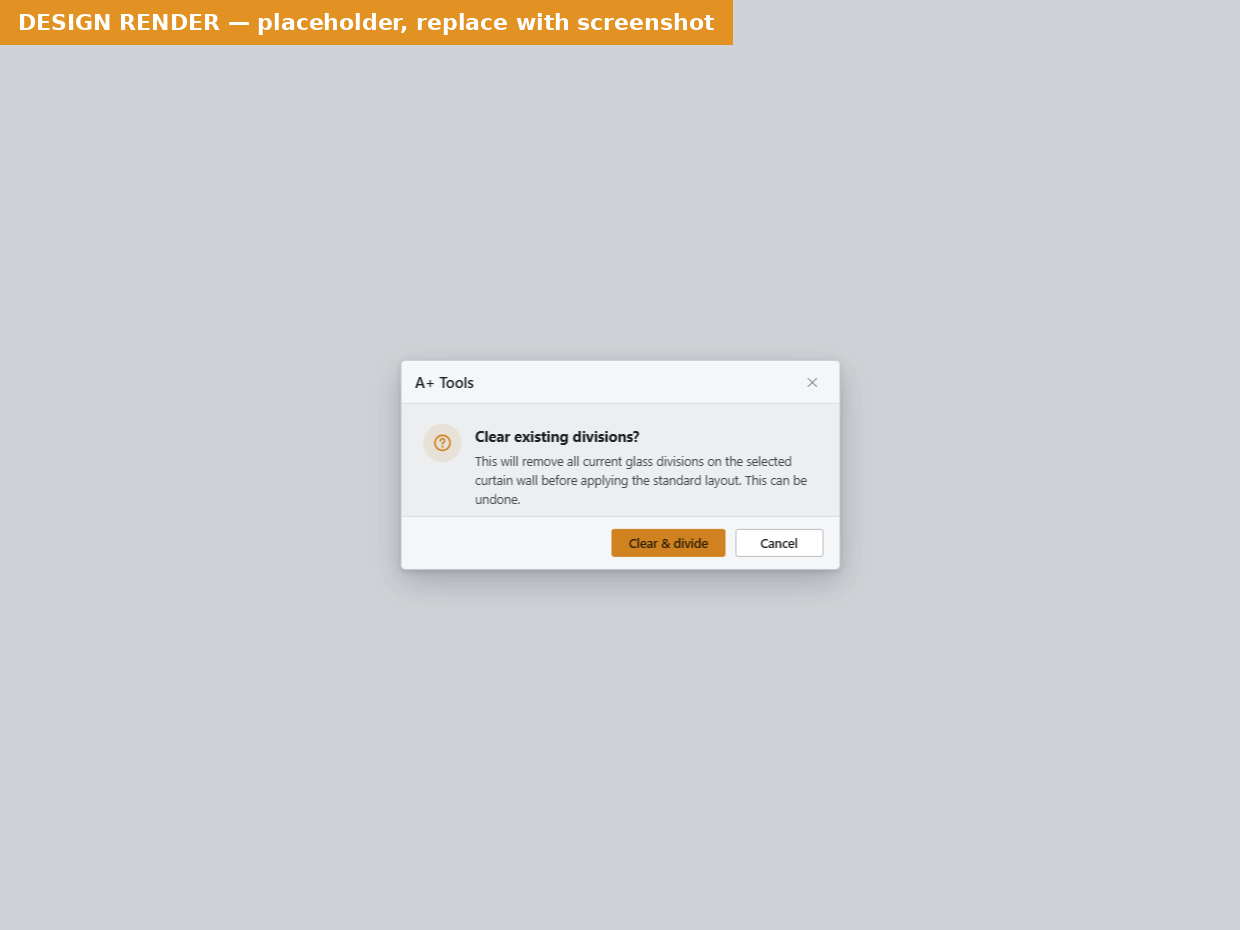 Unsaved changes prompt.
| Button | Result |
|---|---|
| Save & switch | Saves your edits into the current profile, then switches. |
| Discard | Throws your edits away, then switches. |
| Cancel | Stays on the current profile with your edits intact. |
Profiles on the ribbon ("Add as menu item to ribbon")
Turn on Add as menu item to ribbon and click Apply or OK. As soon as at least one profile of a command has the switch on, that command's ribbon button turns into a dropdown:
- one menu item per flagged profile, named after the profile and sorted alphabetically (up to 20 per command — any more are not shown),
- a separator,
- Settings… — opens that command's settings window and, when you click OK, runs the command with the settings you just confirmed. Cancel closes without running.
Clicking a profile's menu item selects that profile and runs the command straight away — no settings window in between. Turn the switch off on every profile and the plain button returns.
 A command button that has become a profile dropdown.
Note — Profiles live in the project, so the ribbon follows the active project: switch to another open project and its own flagged profiles appear. With no project open, the plain buttons show.
Duplicate, Rename and Delete
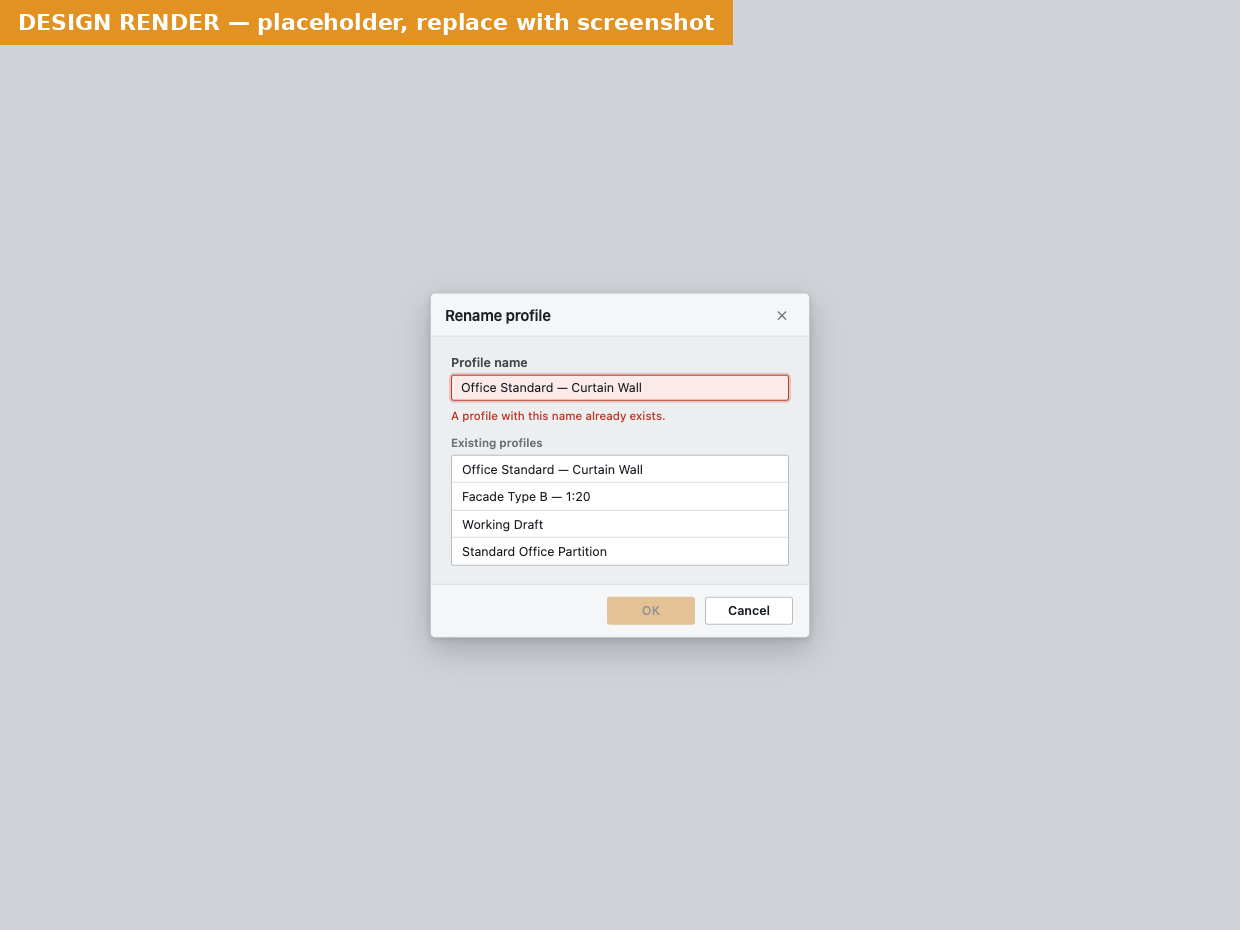 Rename profile — the name is already used, so OK is disabled.
- Duplicate opens Duplicate profile with an empty Profile name: field. The new profile gets the settings currently shown in the window (resolve unsaved edits first — see above).
- Rename opens Rename profile with the current name filled in.
- Both list the Existing profiles: for reference; click one to copy its name into the field. OK stays disabled while the field is empty or matches an existing name (upper and lower case don't count, so facade matches Facade), and the message "A profile with this name already exists." appears.
- Delete asks "Delete the profile '…'?" — Delete or Cancel. Afterwards the first remaining profile is selected.
Duplicate, Rename and Delete are saved to the project immediately. Cancel on the settings window does not undo them — use Revit's Undo (see Saving, Ctrl+S and Undo).
If a profile is renamed or deleted while it is on the ribbon, its menu item follows (or disappears) at once.
Load settings
Load settings… imports one or more profiles into the current project.
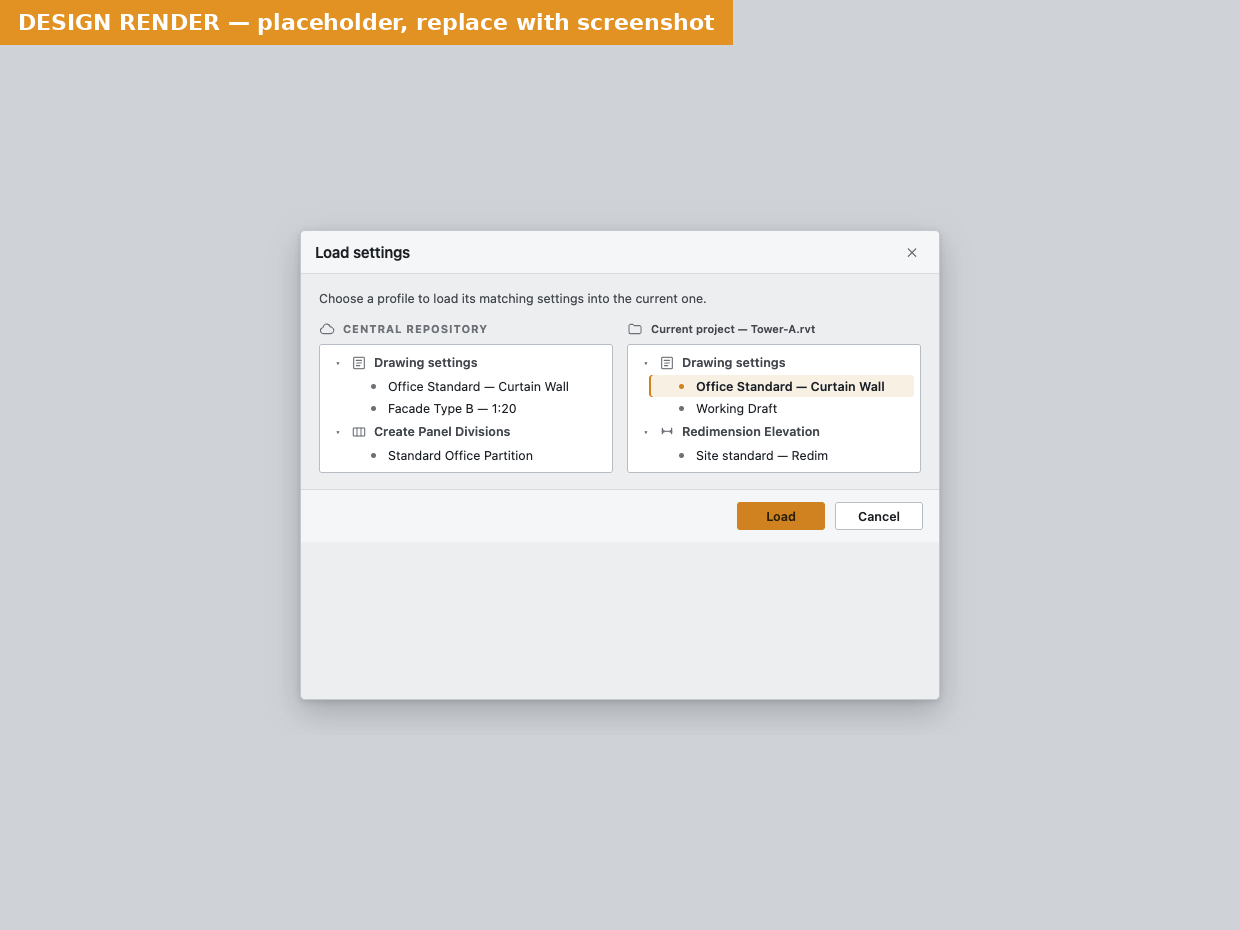 Load settings.
- Click Load settings… on the Profile bar. A+ Tools opens the repository file (this can take a few seconds — the pointer shows a wait cursor).
- Tick the profiles you want. They are grouped by command; you can tick several.
- Optionally narrow the list with Filter: (see below).
- Click Load.
What happens when you click Load:
- If you have unsaved edits, you get the unsaved-changes prompt first.
- Each ticked profile is added to the project under its own name. If the project already has a profile with that name, you are asked "A local profile named '…' already exists. Overwrite it with the central repository's version?" — Overwrite or Cancel (Cancel skips just that profile).
- Any types the profiles need that the project lacks are copied in from the repository; types the project already has are left as they are. A splash shows Loading A+ company settings... with the profile name underneath.
- The profile's Add as menu item to ribbon setting comes with it.
- The last profile loaded becomes the selected one.
- The whole import is one undo step, Load A+ Standards.
Which profiles are offered. Profiles of the same command, plus — for Create Panel Divisions and Redimension Elevation — profiles of Create Drawing, because a Create Drawing profile contains everything those commands need. Loading one copies just the relevant part. The reverse is not possible: Create Drawing cannot load a break-out command's profile, which only carries part of what it needs.
Load from another file. Click … next to the header and choose any Revit project (.rvt) or template (.rte). The list then shows that file's compatible profiles, with the file name as the header. If it has none you see "No compatible profiles were found."
Empty list. If no repository path is set or the file cannot be reached, the list is replaced by a dashed box reading Central repository not available. (or Template repository not available.). If the file was read but holds nothing this command can use, it reads The Central Repository does not contain any valid profiles. (or the template-repository equivalent). You can still use … to load from another file.
Filtering the list
The Filter: box narrows the list to profiles whose profile name or command name contains what you type. The ✕ clears it.
- Plain text is a simple "contains" search and ignores upper/lower case.
- Tick Match case to make it case-sensitive.
- Advanced: if your text contains regular-expression characters (
^ $ | [ ] { } \or.*,.+,(?), it is treated as a regular expression. For example^Facadefinds profiles that start with "Facade", and1:20|1:50finds either scale. While a pattern is incomplete, nothing is filtered out.
The same filter rules apply in Transfer Settings.
Push to repository
Push publishes the profile you are editing — plus the dimension types, view templates, tags and other types it uses — into the central repository (organisations) or your template repository (personal plans). The button's tooltip says which: Push to central repository… or Save to local template repository.
Who sees the button. It is hidden unless you may publish:
- in an organisation, members with the Repository manager role (assigned in the licence portal) — your role is shown in About A+ Tools. If your account has no role information yet, organisation administrators see the button instead;
- on a personal plan, the licence holder.
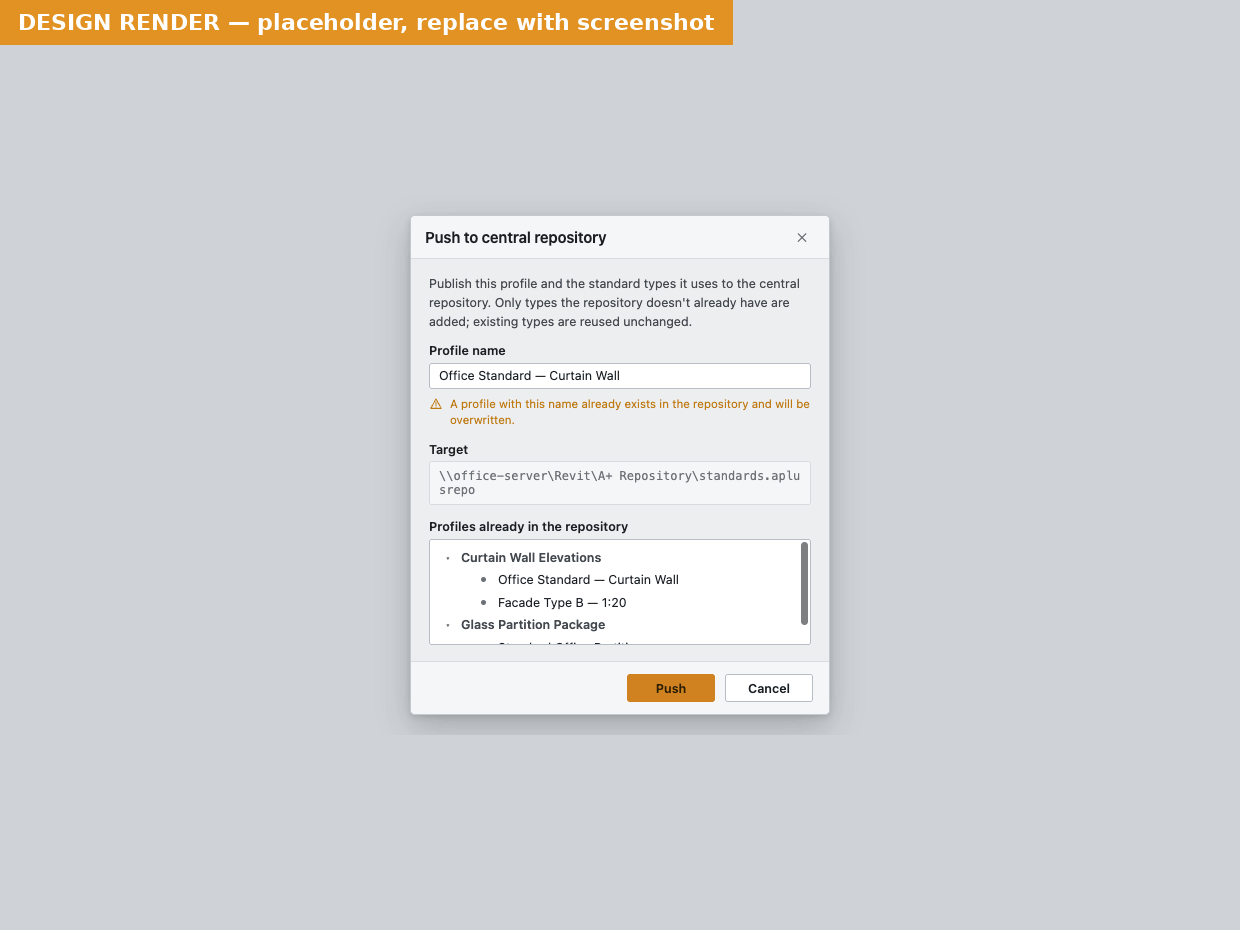 Publish to Repository.
- Click the Push icon on the Profile bar.
- Check or change the Profile name: — it starts as the current profile's name. Clicking one of this command's profiles under Profiles already in the repository: copies its name into the field.
- Check the Target: path.
- Click Push. If the name already exists in the repository (an amber note warns you), confirm with Overwrite.
- A splash shows Publishing to the central repository... (or Saving to the template repository...) while Revit opens, updates and saves the repository file.
- A Published profile summary tells you how many types were added and how many were already present.
Good to know:
- Push publishes what is on screen, including edits you have not applied. Click Apply first if you want the project and the repository to match.
- Only types the repository lacks are copied. A type that already exists there (same name) is reused as-is — Push never changes it.
- If a referenced type no longer exists in the project, it cannot be published; the summary says how many.
- Push does not change the repository profile's Add as menu item to ribbon setting: a new profile arrives without it, an overwritten one keeps what it had.
- Nobody must have the repository file open while you push — see the messages below.
Restore defaults…
Every settings window has a Restore defaults… button at the bottom left. It reloads the default profile from the sample repository:
- Click Restore defaults… and confirm Restore default settings? with Restore.
- The sample repository's default profile replaces the project's profile of the same name (usually Default) and becomes the selected profile. Other profiles are not touched. Any of its types missing from the project are copied in again.
If you have unsaved edits on a different profile, you get the unsaved-changes prompt first. If no sample repository can be read you see No local repository with A+ default settings could be loaded. and nothing changes.
The restored profile starts with Add as menu item to ribbon switched off.
Saving, Ctrl+S and Undo
- Apply saves the window's settings into the selected profile and keeps the window open. Ctrl+S does the same while Apply is enabled (it also works inside the Settings Manager).
- OK saves and closes. Cancel closes and discards edits you have not applied.
- Profile actions — Duplicate, Rename, Delete, Load, Restore defaults — are saved immediately.
- Each save is its own step in Revit's undo list, called Save A+ settings (imports and first-time seeding are called Load A+ Standards). Undo them like any other Revit change.
- Settings you applied are kept even if you then cancel the command (for example with Esc while picking a wall). Only Undo removes them.
- Clicking OK or Apply with no real changes adds nothing to the undo list.
Note — Because settings are undoable, an Undo can remove a profile that is on the ribbon. If you then click its menu item, A+ Tools tells you "The profile '…' no longer exists in this project.", refreshes the ribbon and asks you to pick again.
Settings from other A+ Tools versions
Settings saved by an older version of A+ Tools are upgraded automatically, without any message. The project is stored in the new format the next time settings are saved.
Settings saved by a newer version are never opened or overwritten, so a colleague on the newer version does not lose anything:
| Where the newer settings are | What you see |
|---|---|
| The project | Commands stop with This project requires a newer version of A+ Tools. Click Upgrade to download the update, or Close. |
| The central or sample repository | The central repository requires a newer version of A+ Tools. (or "local sample repository") — its profiles are not offered, and Push into it is refused. |
If a repository is older than your plugin, it still works and you see a one-off notice per session, for example The central repository is of an older version. — an administrator should open the .rte in Revit and save it to upgrade it for good.
The progress splash
Opening a repository file or copying types can take a few seconds. A small splash with a moving bar then appears in front of Revit and closes by itself. It names the source:
| Splash text | When |
|---|---|
| Loading default settings... | Seeding a new project, or copying missing types from the sample repository |
| Loading A+ company settings... (profile name underneath) | Load settings… from the central/template repository |
| Publishing to the central repository... / Saving to the template repository... | Push |
 The progress splash.
Tips
Tip — Office standard workflow. The BIM manager sets up a reference project, tunes one profile per typical situation (for example Facade 1:50, Office partition 1:20), and pushes each one to the central repository. Everyone else opens Load settings… in their project, ticks the profiles they need, and clicks Load — the types come along automatically.
Tip — One profile per wall type on the ribbon. Create a profile for each curtain wall type you draw often, switch on Add as menu item to ribbon for each, and run them straight from the Create Drawing dropdown without opening any settings.
Tip — Set up once, reuse everywhere. Configure dimension types and overrides in a Create Drawing profile first. In Dimension Settings or Panel Division Settings, Load settings… then offers that Create Drawing profile and copies just the matching part.
Tip — Give profiles names that say what they produce (Facade 1:50 – Type mark), not who made them. Upper and lower case don't matter: Facade A and facade a are the same name, so A+ Tools treats them as a clash (and a push or load under the other spelling overwrites the existing profile, after asking).
Tip — Started a new project from an old one that already contains A+ settings? Those settings come with it. Use Load settings… to bring in the latest office profiles.
Tip — Repository files are ordinary Revit templates. If one is open in another Revit session, Push and Transfer cannot save into it — ask colleagues to close it, or try again later.
Messages you might see
| Message | What it means | What to do |
|---|---|---|
| A profile with this name already exists. | The name you typed (Duplicate/Rename) is taken in this command. | Choose another name. |
| Overwrite profile? | Loading or pushing a profile whose name already exists at the destination. | Overwrite to replace it, Cancel to keep the existing one. |
| No reachable central repository is configured. / No reachable template repository is configured. | Push found no repository path, or the file does not exist. | Set the path in Plugin settings (organisations: ask your repository administrator). |
| The central file is locked. | Someone (named if known) has the repository file open. | Try again later. |
| Publishing to the central repository failed. | Push could not open or save the repository (for example no write permission to the folder). | Check folder permissions; the log has details. |
| Published profile — "…Warning: the profile settings could not be written to the repository." | The types were copied but the profile itself was not saved. | Push again; check the log if it repeats. |
| No local repository with A+ default settings could be loaded. | Restore defaults could not read the sample repository. | Check the Sample repository path in Plugin settings; reinstall A+ Tools if the file is missing. |
| Default Sample Project Not Found | No sample repository could be read; new projects start from built-in values. | Reinstall A+ Tools, or fix APlusDefaultSampleRepository in your preferences file. |
| This project requires a newer version of A+ Tools. | The project's A+ settings come from a newer plugin. | Click Upgrade and install the update. |
| The profile '…' no longer exists in this project. | A ribbon menu item pointed at a profile that was removed (often by Undo). | Pick again — the ribbon has been refreshed. |
The full list is on Messages and troubleshooting.
Related pages
- Settings Manager — all three commands' settings in one window
- Transfer Settings — copy profiles and Revit standards between projects and repositories
- Create Drawing, Create Panel Divisions, Redimension Elevation — the settings each command uses
- A+ menu — Plugin settings (language, repository paths, logs)
- Licensing and credits
- Messages and troubleshooting
Last updated 2026-10-02.